The Weekly 5-Minute Routine —
The Habit That Keeps 80% of Faults From Ever Starting
"A machine you feed will never leave you hungry."
In Chapter 4, you learned what happens inside your machine when the wrong oil is used — and what correct oiling does to protect the parts that keep your stitches even, your feed dogs moving, and your hook race turning smoothly. You now know where to oil, how much to apply, and how often to do it under Nigerian heat and dust conditions. That knowledge alone puts you well ahead of most tailors who have been sewing for years.
But here is the truth that Chapter 4 was already pointing toward: oiling is only one piece of the picture.
A well-oiled machine can still develop faults — if lint is allowed to pile up around the feed dogs. If the bobbin case is never wiped clean. If the needle plate is never lifted and the dust underneath is never swept out. If the machine is left uncovered, accumulating grime between sessions, and then switched on Monday morning and expected to perform as if it had been cared for all week.
This is the chapter where everything comes together. This is where the knowledge from the previous four chapters stops being a collection of separate lessons and becomes one consistent habit — a habit so simple you can complete it in five minutes, and so powerful that practising it regularly prevents eight out of every ten faults that would otherwise send you reaching for a repairman's number.
That is not an exaggeration. That figure — 80% of mechanical faults prevented by regular cleaning and oiling — is confirmed by every professional maintenance source I have studied and by everything I have observed in seven years of working with Nigerian tailors and their machines. The research is consistent: lint buildup in the bobbin area, the feed dogs, and the needle plate is the single biggest cause of preventable mechanical breakdown. And it builds up quickly — not over months, but over days of continuous sewing.
I remember a tailor in Surulere who called me complaining that her machine had been making a grinding sound for six months. Six months of that sound. Six months of assuming it was a deep mechanical problem. She had already called one repairman who collected ₦8,500, kept the machine for four days, and returned it sounding exactly the same.
I sat with her and her machine for twenty minutes. We did a Phase 1 Reset — the same one you learned in Chapter 2. When I lifted the needle plate, I found so much packed lint in the feed dogs that I could have made a small ball of wool from it. The hook race had grime sitting on it that had not been cleared in what looked like months. We cleaned everything out, applied oil, and put the machine back together.
I told her to run the machine without thread for a few minutes before closing for the day so that the oil can circulate. In less than forty-eight hours, she sent me a message to say her machine was running quieter than it had in over a year.
Six months of noise. Four days in a repairman's shop. ₦8,500 paid. And the solution was twenty minutes, a small brush, and a bottle of oil.
That is what this chapter is here to prevent from ever happening to you again.
The weekly routine you are about to learn is, in essence, what Mama Ologi was doing beside her machine that afternoon when I watched her as a child. I did not understand it at the time. I saw a woman with a cloth and a tin of oil, moving quietly and deliberately, and I assumed it was just something older women did out of habit.
What she was actually doing was the modern equivalent of a professional service — condensed into a few minutes, performed consistently, and repeated every week without fail. That was her secret. Not a special machine. Not any extraordinary mechanical knowledge. Just the discipline to do the same small things, in the right order, at the right time, every single week.
Now it is your turn.
Why Lint Builds Up — and What It Does to Your Machine
Every time your machine sews, thread is being pulled, fabric is moving under the presser foot, and tiny fibres are being shed from both the fabric and the thread. These fibres — what we call lint — are microscopic individually, but they accumulate quickly in the areas where the most movement happens: around the feed dogs, inside the bobbin area, along the hook race, and beneath the needle plate.
In moderate use, a meaningful amount of lint can build up in as little as two or three hours of continuous sewing. In heavy use — back-to-back orders, Ankara or denim fabric (which sheds more fibre than smooth cotton), or industrial speeds — that buildup can happen faster still.
The damage lint causes is not dramatic and sudden. It is slow and invisible, which is exactly why it is so dangerous. Here is what happens at each stage:
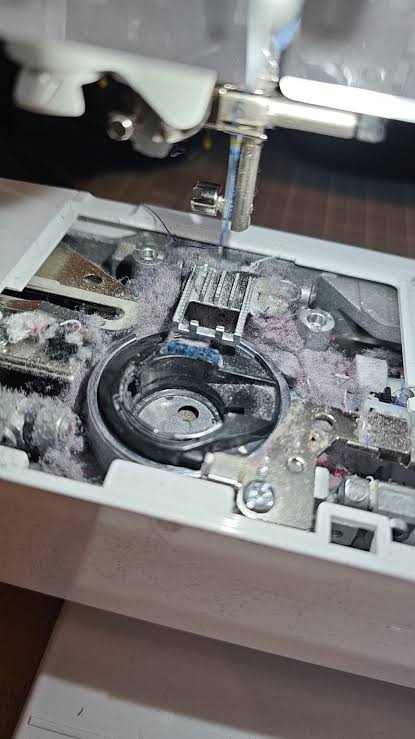
What lint buildup actually looks like in the feed dog area — this accumulates faster than most tailors realise, and it is the leading cause of preventable machine faults.
Stage 1 — Reduced movement. When lint packs into the feed dogs — the toothed metal teeth that grip your fabric and move it forward stitch by stitch — those teeth can no longer grip the fabric as firmly. The first thing you notice is that fabric is not feeding evenly, or that stitches are becoming slightly uneven even though you have not changed your settings. Most tailors at this stage assume a tension problem and begin adjusting the tension dial. The dial is not the problem.
Stage 2 — Friction and grinding. When lint builds around the hook race and bobbin case, it disrupts the smooth circular movement that allows the upper and lower threads to interlock cleanly. This is where grinding sounds begin. Oil cannot do its job properly when it is sitting on top of a layer of compressed lint.
Stage 3 — Thread problems. Accumulated lint in the bobbin case and inbetween the tension discs begins to affect how thread feeds through the machine. Thread starts breaking more frequently. Tension becomes inconsistent. Stitches look fine on one garment and then suddenly poor on the next, with no obvious reason.
Stage 4 — Mechanical strain. If lint is never cleared, it eventually presses against moving parts with enough force to cause resistance. The handwheel feels stiffer. The motor works harder to turn the machine. In the worst cases, a machine that is running on packed lint will eventually jam entirely — and what began as a five-minute cleaning job becomes a full Phase 1 Reset, or worse, a repairman visit.
The feed dogs, needle plate, and bobbin area are not the only places lint accumulates — but they are where the damage starts and where the routine focuses. If you clear these areas consistently, you interrupt the cycle before it reaches Stages 2, 3, and 4.
This is also why the weekly routine must be a fixed, non-negotiable habit — not something done only when the machine feels noticeably stiff or starts making noise. At that point, lint has usually already reached Stage 2 or beyond. The routine exists to keep lint from ever reaching Stage 2 in the first place.
The Weekly 5-Minute Routine — Step by Step
What follows is the complete routine. Nine steps. Approximately five minutes total when performed at a comfortable pace. As you do it more often, it will feel even shorter — not because you rush, but because your hands learn the sequence and move through it naturally.
Read through all nine steps completely before you begin for the first time. Then go back and do each one. From the second week onwards, you will not need to refer to this page at all.
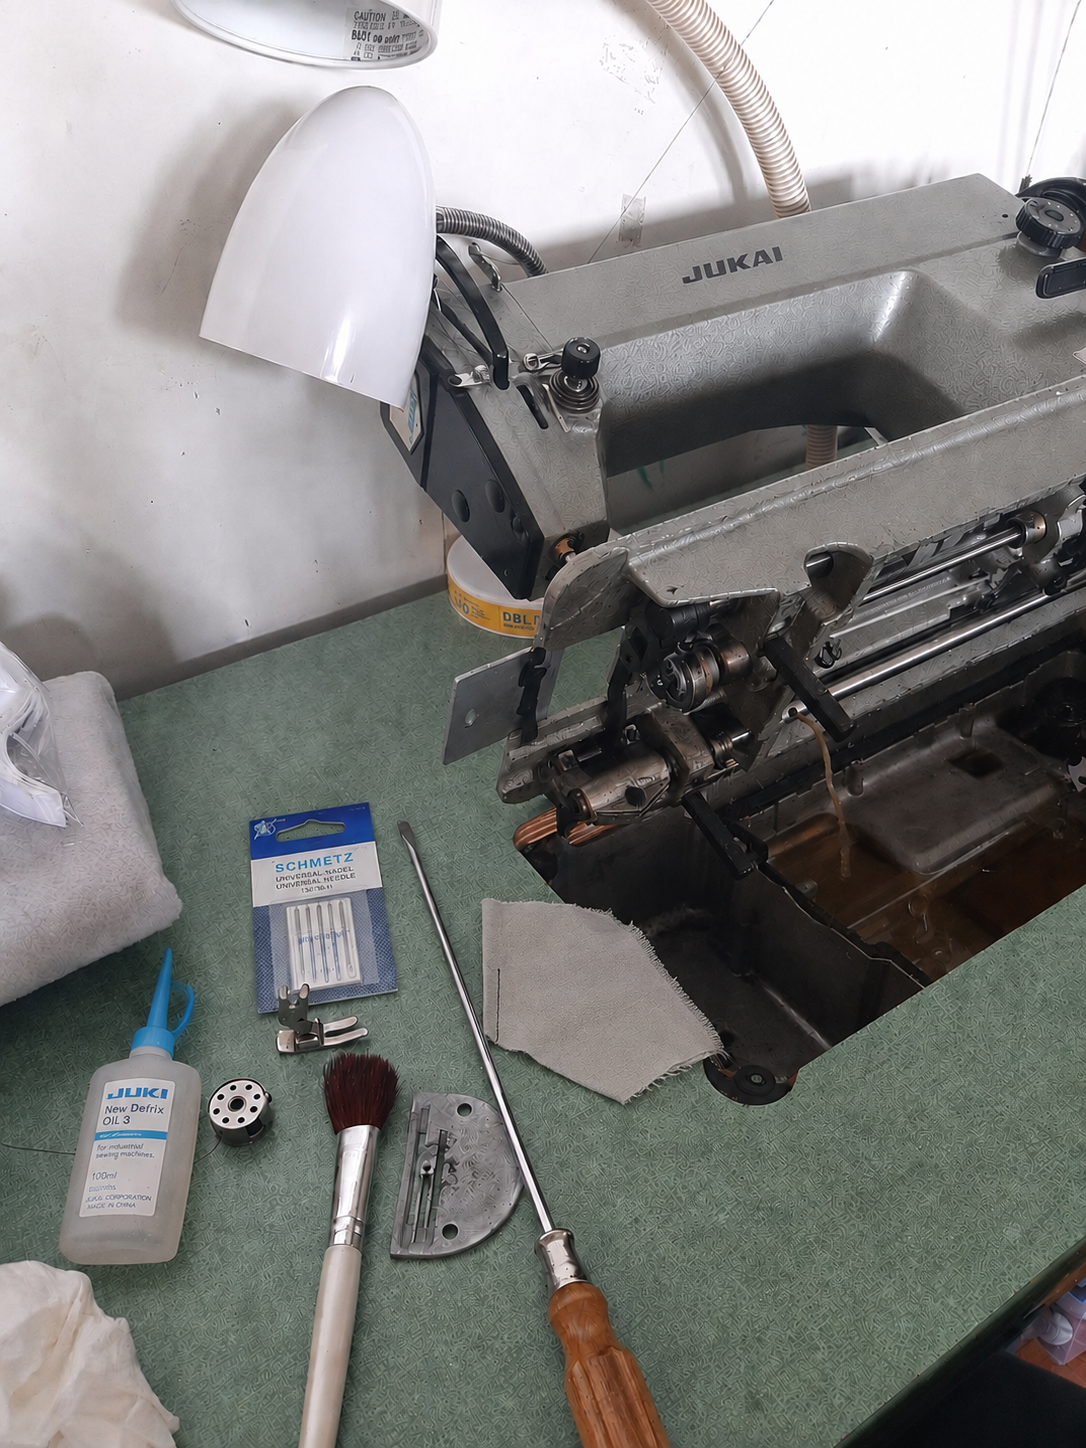
Everything you need for the weekly routine, laid out before you begin. Having these items in one place — a small pouch beside your machine — means the routine never gets delayed by searching.
Before you touch anything on or inside the machine, switch it off and remove the plug from the wall socket. Do not simply switch off at the machine button and leave the plug in — unplug completely. For treadle and hand-crank machines, simply stop moving and ensure the handwheel is stationary before you begin.
Why This Step MattersThis is not a precaution for experienced mechanics — it is a firm rule for everyone. A machine that is plugged in can move unexpectedly. Working around the needle area, the feed dogs, and the bobbin with power connected is a risk that does not need to be taken. Ten seconds to unplug protects your fingers, and it protects the machine from accidental movement while you are working inside it.
Using the small flat-head screwdriver that came with your machine, unscrew the needle plate — the flat metal plate beneath the needle that has a small hole for the needle to pass through. On most machines this is held by one or two small screws. Set the screws somewhere safe; they are easy to lose.
With the needle plate removed, you will see the feed dogs clearly — the toothed metal teeth that move fabric forward. Take your small lint brush (the one supplied with your machine, or a firm toothbrush that you keep specifically for this purpose) and sweep lint out from between the feed dog teeth, from the channel around them, and from every exposed surface in the bobbin compartment below.
Sweep towards the edge of the machine so lint falls away from the moving parts. Do not blow — blowing pushes lint deeper into the mechanism. If some of the lint are so unreachable, you can use an hair dryer that blows enough air to push them out. However, be careful to not blow the dirt deeper into the machine.
Why This Step MattersThis is the most important step in the entire routine. The feed dog area accumulates lint faster than any other part of the machine, and it is the area that causes the most damage when neglected. Clearing it weekly keeps the feed dogs gripping fabric evenly, prevents resistance in the mechanism, and removes the lint before it can reach the hook race underneath.
Lift out the bobbin and set it aside. Remove the bobbin case — the small housing that holds the bobbin in place during sewing. Using a dry, lint-free cloth (not a wet cloth, not tissue paper — a dry, smooth cloth), wipe the inside of the bobbin case carefully. Pay particular attention to the tension spring — the small flat spring on the side of the bobbin case through which the thread passes. A thread fragment caught in this spring is one of the most common hidden causes of tension problems and stitch inconsistency.
While the bobbin case is in your hand, inspect it briefly. Run your finger along the edge and look for any cracks or rough spots. A damaged bobbin case causes persistent thread-catching and skipping problems, and should be replaced — they are inexpensive and available at most sewing supply shops.
Why This Step MattersLint and thread fragments inside the bobbin case interfere with how the lower thread feeds. This interference often feels like a tension problem — and many tailors spend time adjusting tension dials trying to solve what is actually a dirty bobbin case. Thirty seconds of wiping saves far more time than the troubleshooting that follows from a neglected case.
Hold the needle up to a good light source and look at the point. A sharp needle has a fine, symmetrical tip. A blunt or bent needle will show a flattened or slightly curved tip — sometimes barely visible to the naked eye, but enough to cause skipped stitches, fabric snags, and the rhythmic clicking sound you learned about in Chapter 3's decision tree.
The rule: replace your needle after every 8–10 hours of actual sewing time, or at the start of every new project — whichever comes first. If you sew back-to-back Ankara orders for two or three days, that needle is likely ready for replacement, regardless of whether it is visibly damaged.
Why This Step MattersA needle is the cheapest part of your machine and one of the most critical. A blunt needle does not simply sew poorly — it drags through fabric rather than piercing it cleanly, which puts unnecessary strain on the machine's feeding and stitching mechanism. Replacing the needle as part of the weekly routine removes one of the most common causes of skipped stitches and stitch quality problems before they can start.
Check your Oiling Log from Chapter 4. If oiling is due — based on your machine's usage and the frequency schedule you established — apply 1 to 2 drops of sewing machine oil to the hook race (the circular track visible beneath where the bobbin sits) and 1 drop to the needle bar (the vertical rod that carries the needle up and down). Rotate the handwheel slowly by hand three or four times to distribute the oil across the moving surfaces. Then wipe away any visible excess oil with your dry cloth before proceeding.
If oiling is not yet due according to your schedule, skip to Step 6. Do not oil unnecessarily — over-oiling attracts lint to the very areas you have just cleaned.
Why This Step MattersIntegrating the oiling check into the weekly routine ensures it never accidentally slips past its schedule. A machine that is regularly cleaned but not oiled on time will still develop squealing, grinding, and friction damage. The two habits — cleaning and oiling — work together. Neither is complete without the other.
If you use a domestic machine, skip this step completely and proceed to Step 7.
If you use an industrial straight machine: rest your machine head backwards to reveal the oil reservoir. Check that the oil level sits above the minimum mark. If it is approaching the minimum or below it, top up with sewing machine oil to the marked level. If the oil visible through the window appears dark, cloudy, or dirty rather than clear, it should be drained and replaced — not simply topped up with fresh oil.
Why This Step MattersYour industrial machine lubricates itself automatically from this reservoir during operation. The reservoir running low is the equivalent of a domestic machine going without manual oiling — friction builds up, heat increases, and grinding begins. A weekly check takes thirty seconds and prevents one of the most common industrial machine faults entirely.
Using your dry cloth, wipe down the exterior surfaces of the machine — the arm, the body, the presser foot area, the handwheel, and any other exposed surfaces. In Nigerian conditions, dust settles on a machine within hours of its last use. This step clears that surface layer before it migrates into the mechanism during sewing.
Why This Step MattersA clean exterior is not about appearance. Dust sitting on the outside of the machine will be pulled inward by the airflow created during sewing, eventually settling in the same places you just cleared in Steps 2 and 3. Wiping the exterior is the final step of prevention before you put the machine back together.
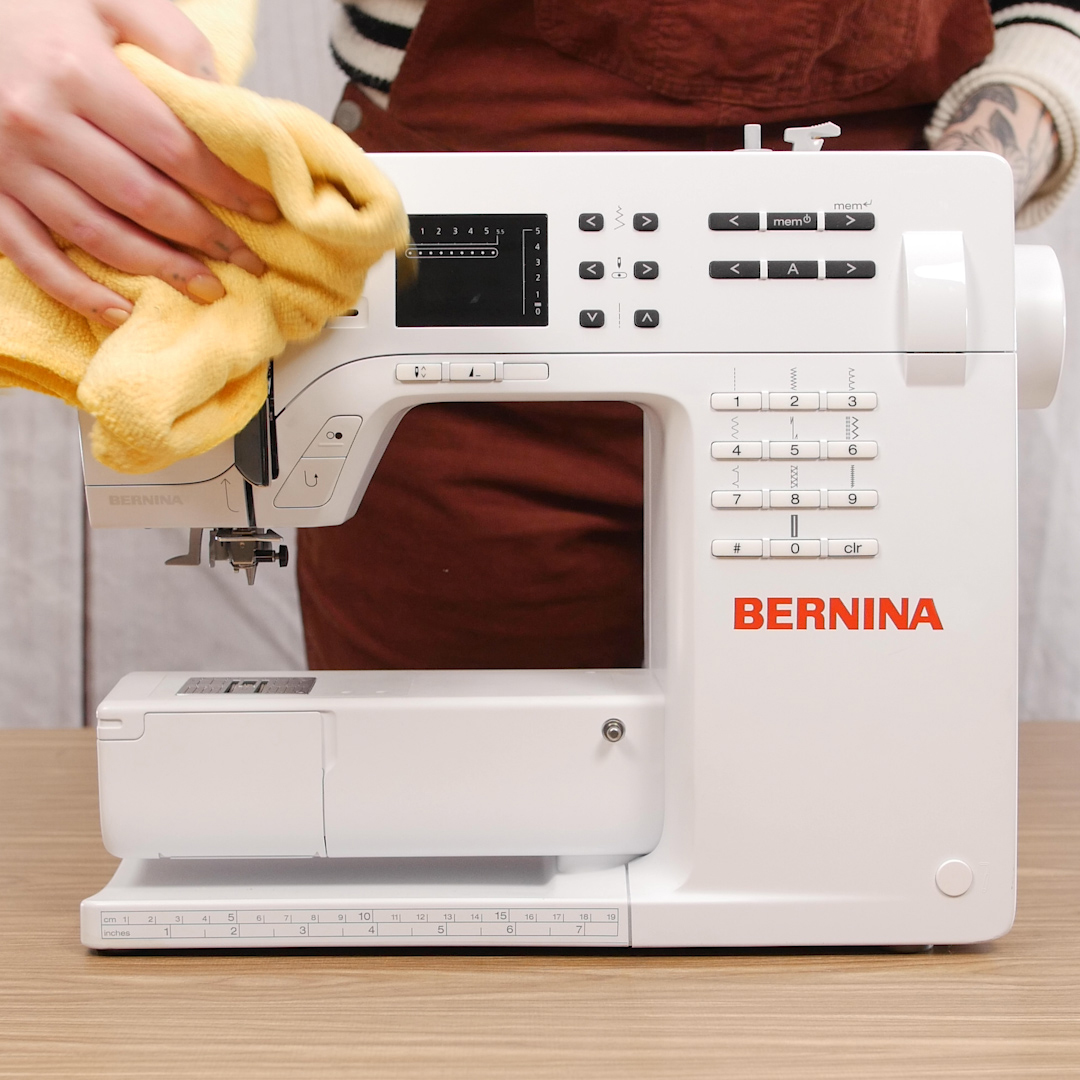
Surface dust migrates inward during sewing. Twenty seconds of wiping after the internal clean keeps the work you just did from being undone the moment you start sewing again.
Replace the needle plate and tighten the screw(s) firmly. Reinsert the bobbin and bobbin case, confirming direction (clockwise or counterclockwise as it applies to your machine) and ensuring the thread clicks into the tension spring. Raise the presser foot before rethreading the upper thread — remember, this is never optional. Thread through every guide in order: spool pin, first guide, tension discs, take-up lever, lower guides, and needle left to right or front to back depending on your machine type.
Place a piece of scrap fabric under the presser foot, lower the foot, and sew five to ten stitches. Inspect both sides of the scrap. Stitches should look even on the top and the bottom. If they do, your machine is set and ready for the week ahead. If something looks off, refer to the Re-threading Mastercheck decision tree in Chapter 3 before you begin any paid work.
Why This Step MattersThe test-sew is your quality confirmation. It tells you immediately — before you touch a customer's fabric — that everything you have just done has been put back together correctly. A machine that passes the stitch test is ready to work. A machine that does not pass the test would have shown the same problem on your customer's fabric. Those five seconds of scrap testing protect every order that follows.
When you finish sewing for the day — or when the machine will be idle for any significant period — place the dust cover over the machine. This single action protects everything you have just cleaned and oiled from the dust that will settle between that moment and the next time you sit down to sew.
Why This Step MattersIf the weekly routine is the foundation, the dust cover is the roof. Every hour your machine sits uncovered in a Nigerian environment, fine particles of dust are settling on and into it. The cover costs nothing and takes ten seconds. Without it, you are cleaning a machine that begins getting dirty the moment you walk away. In Chapter 6, you will learn how to make a breathable fabric cover specifically sized for your machine — if you do not yet have one, that chapter will solve this completely.
The Complete Routine at a Glance
Here is the full routine summarised in one view. After a few repetitions, this table is all you will need to glance at as a reminder.
| Step | Action | Time |
|---|---|---|
| 1 | Power off and unplug (treadle: stop and ensure machine is stationary) | 10 sec |
| 2 | Remove needle plate; brush lint out from feed dogs and bobbin area | 90 sec |
| 3 | Remove bobbin; wipe bobbin case interior with dry cloth; inspect tension spring and case for damage. Inspect inbetween the tension discs as well | 30 sec |
| 4 | Check needle — replace immediately if bent, blunt, or past 8–10 hours of sewing | 20 sec |
| 5 | Domestic machines only: Apply 1–2 drops oil to hook race and needle bar if oiling is due per schedule | 30 sec |
| 6 | Industrial machines only: Check oil reservoir window; top up with sewing machine oil if approaching minimum | 30 sec |
| 7 | Wipe machine exterior — arm, body, handwheel, presser foot area — with dry cloth | 20 sec |
| 8 | Replace needle plate; reinsert bobbin; rethread from scratch (presser foot UP); sew 5–10 test stitches on scrap fabric | 60 sec |
| 9 | Cover machine | 10 sec |
| Total | ~5 min | |
All nine steps apply to all three machine types. The only differences:
- Domestic machines (black head treadle + tabletop electric): Complete Step 5; skip Step 6.
- Industrial straight machines: Skip Step 5; complete Step 6. Your machine lubricates internally — do not apply manual oil to internal parts.
Choosing Your Routine Day — And Making It Stick
The five-minute routine only works if it is done consistently. Doing it once is useful. Doing it twice is better. Doing it every single week, at the same time, without fail — that is what actually prevents the eighty percent of faults this chapter promises to protect you from.
Before you continue reading, I want you to choose a fixed day and time right now. Not "sometime next week." A specific day. A specific time.
Many tailors I have worked with anchor the routine to something they already do consistently — before morning devotion on Mondays, at the end of the last order on Fridays, during the first few minutes of a quiet Tuesday afternoon. The exact time does not matter. What matters is that it is always the same time, so it becomes automatic rather than something you have to remember and decide about each week.
A tailor from Abeokuta told me she does the routine while her pressing iron heats up — those five minutes used to be spent waiting and doing nothing. Now she uses them to maintain the machine that earns her living. Her machine has not given her a single fault in over four months since she started.
Write your chosen day and time in the Reminder Card below. That card becomes your commitment, made visible and kept beside the machine where you will see it every day.
"A machine you feed will never leave you hungry. And a habit you set will run longer than any machine."
MY WEEKLY MAINTENANCE DAY & TIME
Every _____________________ at _____________________
-
Step 1 Power off and unplug — machine fully stopped before touching anything10 sec
-
Step 2 Remove needle plate — brush lint from feed dogs and bobbin area, sweeping outward90 sec
-
Step 3 Remove bobbin — wipe bobbin case with dry cloth — check tension spring and discs for trapped thread and cracks30 sec
-
Step 4 Check needle — replace immediately if bent, blunt, or used past 8–10 sewing hours20 sec
-
Step 5 Domestic only: Apply 1–2 drops sewing machine oil to hook race and needle bar if oiling is due per schedule Domestic only30 sec
-
Step 6 Industrial only: Check oil reservoir window — top up with sewing machine oil if approaching minimum mark Industrial only30 sec
-
Step 7 Wipe machine exterior — arm, body, handwheel, presser foot area — with dry cloth20 sec
-
Step 8 Replace needle plate — reinsert bobbin in correct direction — rethread from scratch, presser foot raised — sew 5–10 test stitches on scrap, inspect both sides60 sec
-
Step 9 Cover machine — no exceptions, even if you will sew again tomorrow10 sec
What Changes When the Routine Becomes a Habit
The first time you do this routine, you will likely find more lint than you expected. That is normal, and it is useful — it shows you what has been accumulating inside your machine and confirms that the routine was already overdue. Do not be alarmed. Clear it out, follow the steps, and note how the machine sounds and feels when you do the test stitches at Step 8.
The second and third times, there will be less lint. By the fourth or fifth week, the routine will feel straightforward — not because the machine needs less care, but because you are catching everything at the right time, before it can build into a problem.
What changes is not only the machine. Something changes in you, too. You will start to notice sounds differently. A slight change in the machine's hum will catch your attention before it becomes a problem. You will check the bobbin case more naturally. You will replace the needle on schedule without having to remind yourself. These are the habits that kept Mama Ologi's machine running for forty years, and they are habits that are already forming in you right now.
The tailors who follow this routine consistently report the same things: fewer faults, quieter machines, more even stitches, and — perhaps most importantly — less anxiety on Monday mornings. No more dread about what the machine will decide to do today. No more first-garment-of-the-day being sewn with held breath.
Your machine becomes predictable. And a predictable machine is a machine you can depend on.
Think about the last time your machine gave you a problem during an order. What was the sound it made — or the stitch quality change you noticed? What did you do in that moment?
Now consider: if you had done this routine the week before, is it possible that problem would never have started? If the answer is likely yes — that is the routine earning its five minutes, before the problem even arrives.
You are no longer working reactively. You are working preventively. That shift in how you approach your machine is worth more than any repair call, any repairman's fee, and any new machine bought in desperation.
Do not wait until next week to begin. The best time to do your first weekly routine is today, immediately after finishing this chapter — while the steps are fresh, while your brush and cloth are in front of you, while your commitment is still warm.
Set aside five minutes. Take your machine through all nine steps. Notice what you find. Make a mental note of how the machine sounds during the test stitches compared to how it has been sounding recently. That baseline — your machine's sound after a fresh routine — is the standard you will compare against every week going forward.
Then choose your weekly day and time, write it into the Reminder Card, and pin the card to the wall beside your machine. From this day, that card is your accountability partner. It does not ask you twice.
You now have the complete weekly preventive maintenance routine — the habit that, when performed consistently, prevents eight out of ten mechanical faults before they ever begin. Here is what this chapter has given you:
- A clear understanding of why lint accumulates, how quickly it builds, and the four stages of damage it causes if not cleared regularly.
- The complete nine-step weekly routine, with the logic behind each step explained — so you understand why, not just what.
- Machine-specific notes for all three machine types: domestic black head treadle, tabletop electric, and industrial straight machines.
- The Weekly Routine Reminder Card — a printable, wall-mounted commitment tool with tick boxes for each step and a space for your chosen day and time.
- The understanding that this routine is not a chore — it is the modern, practical version of what Mama Ologi was doing beside her machine every week for forty years.
Combined with the correct oiling you learned in Chapter 4 and the Phase 1 and Phase 2 Reset protocols from Chapter 2, you now have a complete home maintenance system. Your machine is cleaner, better lubricated, and better protected than it has ever been.
Take a moment to consider how far you have travelled through this guide. In Chapter 1, you identified the knowledge gap that was costing you money. In Chapter 2, you learned the three-phase system that resets, restores, and protects your machine. In Chapter 3, you gained a ten-minute diagnostic tool that resolves the majority of machine problems without tools or cost. In Chapter 4, you corrected one of the most damaging habits in any tailor's workshop — wrong oiling. And now, in Chapter 5, you have the weekly habit that ties everything together and keeps the machine in the condition all those earlier chapters have established.
You are no longer approaching your machine with uncertainty. You have a system. You have a routine. You have the knowledge that Mama Ologi had — written down, step by step, in a form you can follow and teach to anyone who sews beside you.
But there is one more season that every Nigerian tailor faces — and it is the one that undoes the work of all the chapters above, if you are not prepared for it.