Chapter Four
The Correct Oiling Method — Where, How Much, and How Often
The maintenance mistake that destroys machines silently — and exactly how to stop it.
A Memory
I once watched a neighbour pour groundnut oil into his sewing machine. He held the bottle above the arm and let it drip in, nodding like a man who knew exactly what he was doing.
He was not careless. He was not foolish. He simply did not know. That is the story of this chapter — and it is the story of hundreds of machines across Nigeria that are being fed with what they do not enjoy.
In Chapter 3, you learned the Re-threading Mastercheck — a ten-minute, no-tools diagnostic that resolves the majority of machine problems the moment they appear. If you have already used it to silence something your machine was struggling with, you know exactly what that feels like: a problem that seemed mechanical, solved in minutes, by your own hands. That confidence belongs to you now.
But the Mastercheck is a corrective skill. It fixes what has already gone wrong. What this chapter teaches is different — it is a protective skill. The kind that stops problems from starting in the first place.
Oiling is one of the most important thing you can do to prevent your machine from developing faults. And most Nigerian tailors are either not oiling at all, oiling with the wrong substance, oiling in the wrong places, or oiling so infrequently that the machine is quietly wearing down between sessions. Any one of these habits causes damage that builds slowly and invisibly — until the day the machine simply stops working the way it should.
This chapter will correct all of that. It will tell you exactly what to use, where to apply it, how much, and how often — calibrated specifically for Nigerian machines and Nigerian conditions. By the time you finish reading, you will never have to guess about oiling again.
⚠️ For Industrial Machine Owners — Read This Before Anything Else
If you use a large industrial straight sewing machine — the standalone type with a clutch motor, servo motor, or built-in servo (direct-drive) — there is one thing you must know before this chapter goes any further.
Your machine lubricates itself automatically.
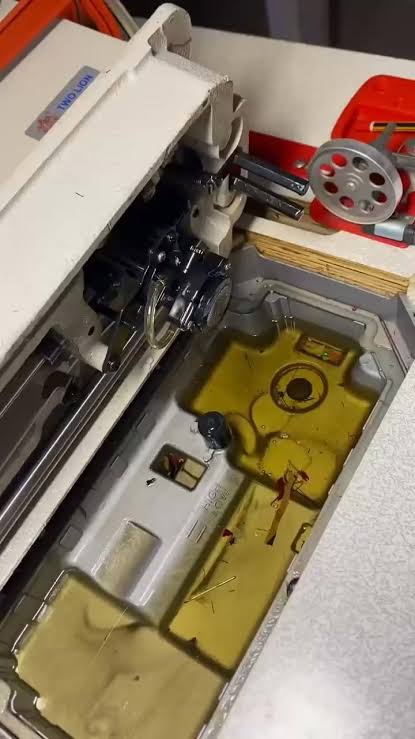
Industrial sewing machines are fitted with a built-in lubrication system. A reservoir of sewing machine oil sits underneath the machine and is circulated through the internal parts automatically while the machine operates. You do not need to — and must not — open the machine body and manually oil the internal mechanisms. Doing so disrupts the automatic system and can damage seals that are costly to replace.
⚠️ Critical — Industrial Machine Owners Only
Do not manually oil the internal parts of an industrial sewing machine. The machine manages its own lubrication. Adding oil manually to internal components disrupts the automatic system and can cause damage that is expensive to reverse.
What you must do instead — regularly and consistently — is manage the oil reservoir:
- Rest your machine head backwards till it confortably rest on the support attached to the table. This allows you to check the oil level at a glance.
- Check it once a week if you sew daily. If you sew heavily, check it more often.
- When the level approaches the minimum mark, top up with pure sewing machine oil to the correct level. Do not allow it to drop below the minimum — the machine will run dry internally.
- If the oil in the reservoir appears dark, cloudy, or discoloured — do not simply top it up. Drain the reservoir completely and refill with fresh oil. Dirty oil carries fine particles that accelerate internal wear.
- Keep the external bobbin area clean. Lint accumulates around the bobbin case and hook race on all machine types, including industrial. This area must be brushed out regularly.
- If your machine makes grinding or squealing sounds despite a full, clean reservoir — do not add more oil. This signals an internal problem requiring professional attention. See Chapter 7 for guidance on when and how to engage a repairman.
Industrial machine owners: once your reservoir is checked and managed, continue reading through the “Where to Oil on Domestic Machines” section below. The hook race oiling point and the oiling session checklist both contain steps that apply directly to you for external cleaning. The manual oiling rules for internal parts do not apply to your machine — but lint removal and external care apply to every machine type without exception.
For Domestic Machine Owners — Black Head Treadle & Tabletop Electric
The classic black head treadle machine and the modern tabletop electric machine both require manual oiling of their internal friction points. Neither machine lubricates itself (except some very rare domestic electric machines). For most, if it is not being oiled — or if it is being oiled with the wrong substance — every stitch it sews is increasing the wear on its moving parts.
Correct oiling is simple, inexpensive, and takes only a few minutes. Let us begin with the most important principle of this entire chapter.
The Foundational Rule
Only one substance belongs inside your sewing machine: pure, clear, odourless sewing machine oil. Not something that looks similar. Not something that worked before. Nothing else — ever.
This is not a preference. It is not a guideline that allows for reasonable substitutions. It is an absolute rule — and what follows explains exactly why it matters so much.
The Oils That Are Destroying Nigerian Machines — And Why
Before we cover what you should do, let us address what many Nigerian tailors are currently doing — because if you scored high on the Self-Audit in Chapter 1, there is a reasonable chance one of these substances has been used on your machine. You are not alone in this, and it is not your fault. These oils are found in every Nigerian home and workshop. The problem is that what is harmless — or even useful — in the kitchen is destructive inside a sewing machine.
| Oil / Substance | What It Feels Like When Applied | What It Actually Does to Your Machine |
|---|---|---|
| Vegetable oil / groundnut oil / palm oil / cooking oil | Smooth and familiar — seems to lubricate immediately | Becomes sticky and rancid with heat. Clogs and hardens inside moving parts over weeks. Difficult to remove once hardened. The machine seizes gradually, from the inside out. |
| Coconut oil | Light, clean-smelling, seems gentle and harmless | Solidifies when temperatures change. Clogs the same way vegetable oils do. Nigeria’s heat accelerates the hardening process significantly. |
| Engine oil / motor oil | Thick and heavy — feels like serious industrial lubrication | Far too thick for precision sewing machine parts. Attracts heavy dust particles. Creates a dense sludge inside the mechanism that progressively slows and eventually locks the moving parts. |
| WD-40 | Light, sprays easily, smells as though it is cleaning and protecting | WD-40 is a water-displacement solvent, not a lubricant. It actively strips away any good oil already present and causes internal corrosion with repeated use. Machines treated with WD-40 rust from the inside. |
| 3-in-1 oil | Thin and runny — appears similar to sewing machine oil | Leaves a tacky residue that accumulates over time. Not formulated for fine precision parts. Attracts lint and progressively gums up the internal mechanisms. |
Notice the pattern in that middle column. Every wrong oil feels reasonable at the moment of application. The machine does not seize immediately. It does not protest loudly. The damage accumulates quietly, invisibly, over weeks and months — which is precisely what makes wrong oiling so costly. By the time the machine makes a serious noise or refuses to sew, the harm is already deep inside the mechanism.
In my experience working with tailors across different parts of Nigeria, wrong oiling is one of the most common hidden causes of machine breakdowns that get misdiagnosed as something else. A machine is taken to a repairman, he cleans it out and oils it correctly, and returns it working — and then the same problem returns within three months because the wrong oil is applied at home again. The machine is not the problem. The oil is.
The solution is permanent and straightforward: pure sewing machine oil, every time, with no substitutions. It is a thin, clear, non-sticky mineral oil formulated specifically for metal-to-metal contact at precision tolerances. It lubricates cleanly, does not harden, does not corrode, and does not attract unusual amounts of lint. It is also inexpensive and available at any sewing machine shop.
📌 Where to Find Sewing Machine Oil in Nigeria
Look in sewing machine repair shops, fabric markets, and shops selling sewing accessories. Ask specifically for “sewing machine oil” — usually clear or pale yellow in colour. A reputable seller will confirm it is made specifically for sewing machines; a reputable label will say so clearly.
Stock two bottles at a time. Running out during a heavy order period — or at the start of harmattan season — is a situation worth avoiding. Chapter 6 covers harmattan protection in full.
The Six Oiling Rules — For Domestic Machines
Once you have the correct oil, the procedure itself is simple. Six rules govern everything. Follow them consistently and your machine will run the way it was built to run: quietly, smoothly, and for a very long time.
-
Use only pure, clear, odourless sewing machine oil — nothing else. Not something that looks similar. Not the oil that “worked fine before.” Not a substitute a neighbour recommended. Pure sewing machine oil, sold specifically for this purpose. Every other substance causes damage of one kind or another, and the damage builds silently.
-
Apply one to two drops per oiling point — never more. More oil is not better lubrication. Excess oil soaks into the surrounding mechanism, attracts lint, mixes with dust, and creates a sludge that causes the very stiffness you were trying to prevent. One drop. Two at most. That is the correct measure for every single point.
-
Always oil with the machine switched off and unplugged. For electric machines: off at the switch, unplugged from the wall. For treadle machines: brought to a complete stop. You are not oiling a machine in motion — you are applying lubrication to stationary parts that you can reach safely.
-
After oiling, rotate the handwheel by hand ten times. This distributes the fresh oil through the friction points before any sewing begins. You are not testing the machine — you are working the oil into the surfaces where it needs to sit. Ten slow, deliberate rotations is the correct amount.
-
Wipe all visible excess oil with a dry, clean cloth before sewing. Oil remaining on surfaces near fabric will transfer to your customer’s material — and oil stains on expensive fabric are not a conversation any tailor wants to have. A thorough wipe of every oiled area, followed by a few test stitches on scrap fabric, ensures clean work before you begin.
-
Oil only metal-to-metal friction points — never plastic parts. Oil on plastic does nothing useful and can cause parts to become slippery in ways that affect how they work. When you are looking for oiling points, you are looking for places where two metal surfaces meet and move against each other. If it is plastic, leave it alone.
Where to Oil on Domestic Machines
Knowing which points to oil is as important as knowing which oil to use. Oil applied to the wrong surface — a plastic part, a non-friction area — is wasted at best and harmful at worst. Oil applied to the correct friction points protects the most essential parts of your machine and extends its working life significantly.
-
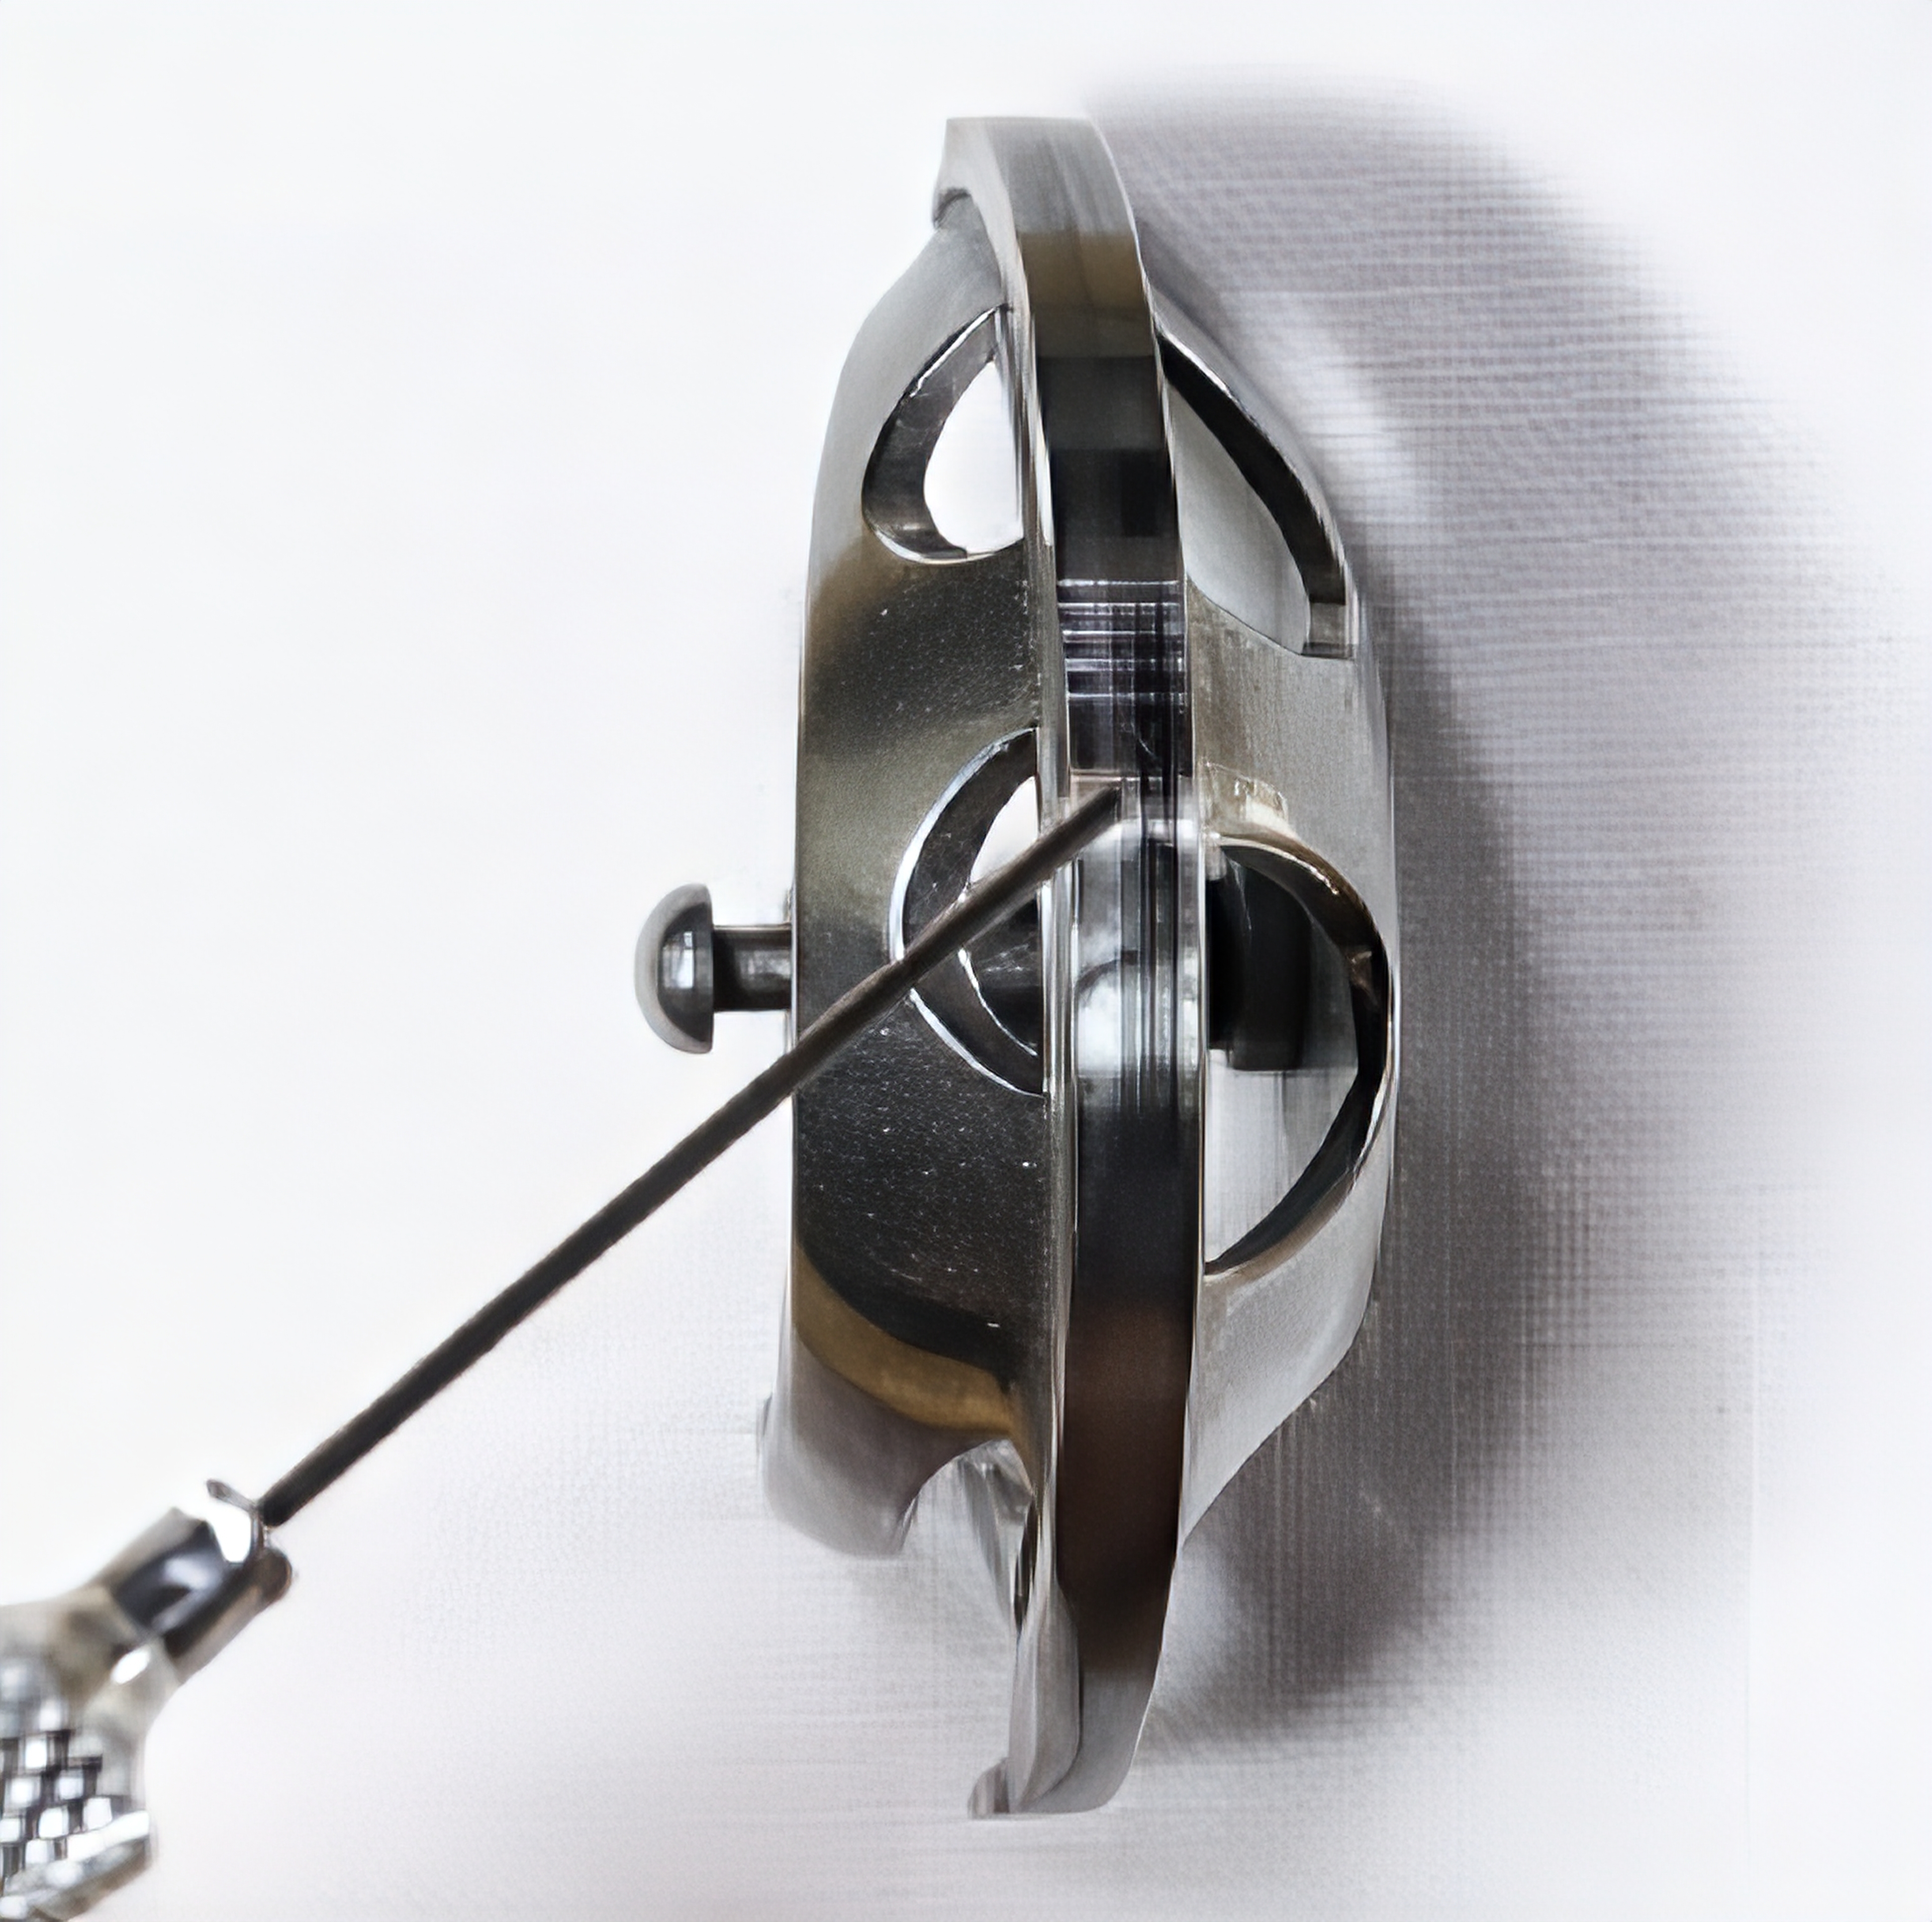
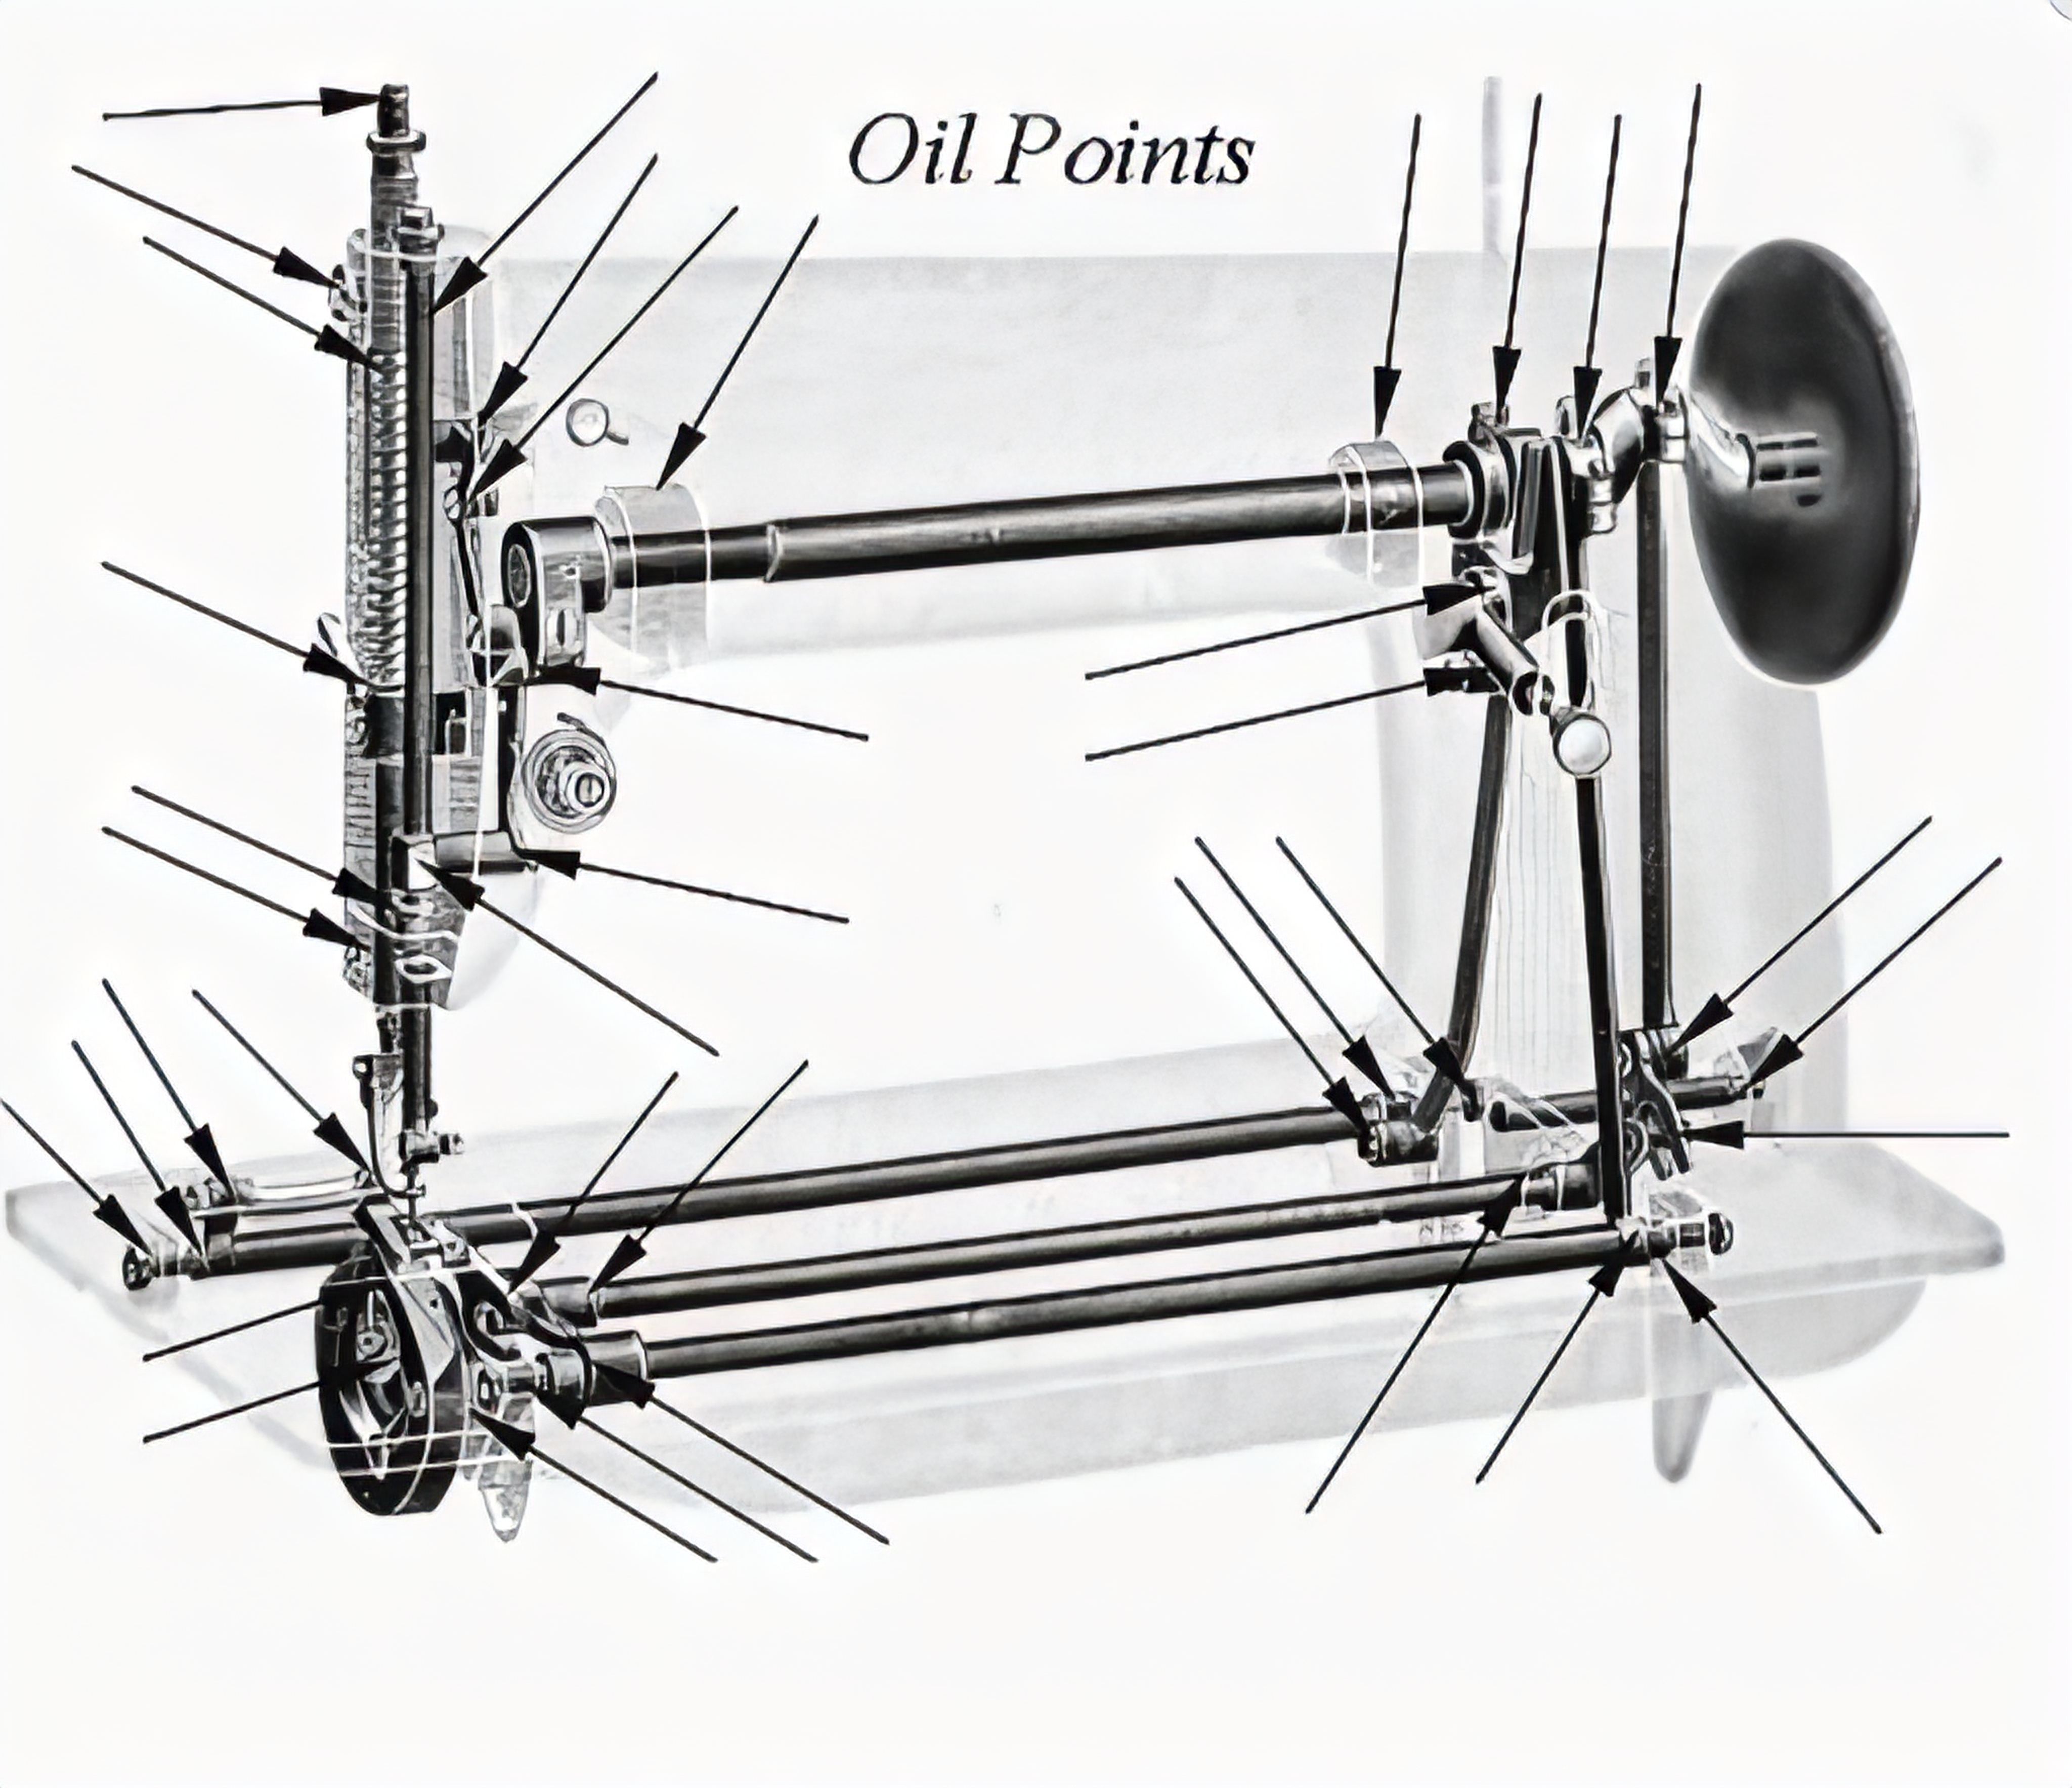
Hook Race / Shuttle Race — The Most Critical Point This is the circular metal track around which the bobbin case sits and rotates during sewing. Every stitch your machine forms passes through this area — it is the busiest friction point on the machine. If only one point ever receives oil, it must be this one. Apply one to two drops every time you oil, without exception.
-
Needle Bar — The Rod That Drives the Needle The needle bar moves up and down at speed every time a stitch is formed. The points where it enters and exits the machine body — at the top and bottom of its travel — are friction points. Apply one drop at each visible pivot on the needle bar.
-
All Marked Oiling Holes on Black Head Treadle Machines The classic black head machine has between 15 and 30 small round oiling holes drilled into the body — along the top arm, at the joints, and underneath. These holes are not decorative. Each leads to a friction point inside the mechanism. Run your finger slowly along the entire top arm and underneath the machine body to feel for them — they are typically 2–4mm in diameter. One drop in each hole, every time you oil.
-
Visible Metal-to-Metal Pivot Points When Covers Are Removed When the needle plate or any side cover is removed during a Phase 1 Reset, additional metal linkages and hinges become visible that are normally hidden. Any place where one metal piece slides or rotates against another is a friction point. Apply one drop to each visible junction when the covers are off.
-
Tabletop Electric Machines — Consult Your Machine Modern tabletop machines (Brother, Singer, Toyota, Janome) vary significantly in how many oiling points are externally accessible. Some have clearly marked oil points; others have a more enclosed mechanism. The threading diagram on or inside the machine often includes oiling instructions. At minimum, the hook race and needle bar are accessible on virtually all tabletop models and must be oiled on the correct schedule.
🔵 Machine Note — Black Head Treadle Machines
On the black head treadle machine, oiling is a more thorough process than on a tabletop electric. This machine was designed to be manually maintained across every accessible point — and it rewards that attention generously. Work slowly along the entire length of the top arm, feeling for oiling holes. Check underneath the machine body as well; some holes are only accessible by tilting the machine back slightly.
Once you know what you are looking for, this becomes a satisfying routine rather than a daunting task. The machine itself tells you when it has been well oiled: the sound changes. Quieter. Smoother. More consistent.
How Often to Oil — A Schedule Built for Nigerian Conditions
One of the most common oiling mistakes is treating it as a calendar-based task — “once a month” regardless of how many hours the machine has actually been running. This approach either over-protects a machine that has barely been used, or under-protects a machine that has been sewing for five hours a day.
The correct approach is to measure oiling frequency by hours of actual sewing, not days on a calendar. Your machine’s friction points wear when the machine is in motion — not when it is sitting covered and unused. A machine that has sewed for eight hours needs fresh oil; a machine that sat idle for three weeks but only sewed for an hour does not need oil on that basis alone.
Nigeria’s environment adds a second variable that most oiling guides written for other countries do not account for. Heat thins oil faster than cooler operating conditions. Dust — particularly during harmattan season — enters the mechanism during sewing, mixes with the oil film, and accelerates metal-to-metal friction. From my direct observation of how machines behave in Nigerian workshops, I have consistently found that dusty and hot conditions reduce the protective life of an oiling session by roughly 25 to 40 per cent compared to a cleaner, cooler environment. This is why the schedule below gives you two columns: one for normal conditions, one for harmattan and dusty-season sewing. Use the correct column for your current season.
| Your Daily Usage Level | Regular Season Interval | Harmattan / Dusty Season Interval |
|---|---|---|
| Light use — under 2 hours of sewing per day | Every 2–3 weeks | Every week |
| Moderate use — 2 to 5 hours of sewing per day | Every 8–10 hours of sewing | Every 5–6 hours of sewing |
| Heavy use — 5+ hours per day, back-to-back orders | Every 4–6 hours of sewing | Every 3–4 hours of sewing |
The harmattan column is not a precaution for extreme situations. For many parts of Nigeria, harmattan conditions — dry air, elevated dust, low humidity — last for several months of the year. During this period, the tighter intervals in the right-hand column apply to your machine. Chapter 6 covers the full harmattan protection protocol, including how to adjust your cleaning routine and how to make a breathable dust cover that fits any machine type.
🔩 How to Know When Your Machine Needs Oil
Your machine will generally signal you before you need to consult any schedule. Learn to recognise these signs:
- A high-pitched squeal or screech during sewing — this is the clearest signal. Metal surfaces are making contact without adequate lubrication. Oil the machine immediately and do not continue sewing until you do.
- The handwheel feels stiffer than usual — or the treadle feels heavier to operate. The machine is working harder than it should. Check the neck of the wheel for thread or lint buildup; remove if any found; and oil immediately.
- A subtle change in the machine’s hum — from smooth and even to slightly rougher, higher, or irregular. Address this before it develops into a squeal.
- You cannot remember when you last oiled — if you have to think hard and still are not sure, it is time to oil. The Oiling Log below is the tool that prevents this situation from arising.
Do not wait for the squeal before acting. The squeal is the machine telling you it has already been running without adequate lubrication. Consistent oiling on schedule prevents the squeal from ever starting.
Practical Tool
Your Monthly Oiling Log — 12-Month Maintenance Record
This log does two things. First, it builds the habit. When you have a record to fill in, you are far more likely to oil on schedule — because you can see exactly when the last session was and how many hours have passed since. Second, it creates a maintenance history for your machine that proves its value if you ever need to involve a repairman. A tailor who arrives with a completed log is taken more seriously, and a repairman who can see the machine’s history makes a faster, more accurate diagnosis.
You can print this page and keep it near your machine. Fill in one row every time you oil.
| Machine / Model | Date Oiled | Hours Sewn Since Last Oiling | Oiling Points Covered | Any New Sounds or Issues? | Next Oil Due |
|---|---|---|---|---|---|
Oiling Session Checklist — Use This Every Time
Until oiling becomes as natural as threading your machine, use this checklist every time you sit down to oil. Work through it in order. Tick each step as you complete it. You will not skip anything important, and you will finish confident that the job was done correctly.
Oiling Session Checklist — Domestic Machines
- Switch off and unplug the machine (or bring the treadle to a complete stop) before touching any oiling point.
- Confirm you are using pure sewing machine oil — clear, thin, odourless. Not cooking oil. Not engine oil. Not WD-40. Not any substitute. If you are not certain what is in the bottle, do not use it.
- Remove the needle plate and brush out any lint from the hook race area, feed dogs, and bobbin compartment before applying fresh oil. Oiling over accumulated lint pushes dirt deeper into the mechanism rather than lubricating it.
- Apply 1–2 drops to the hook race / shuttle race. This is the most critical oiling point on any domestic machine. Never skip it.
- Apply 1 drop to the needle bar — at the top and bottom pivot points where the bar enters the machine body.
- Apply 1 drop to each oiling hole along the top arm and underside of the machine (black head machines). Run your finger slowly along the arm to locate every small round hole.
- Apply 1 drop to all other visible metal-to-metal pivot points exposed by removed covers. One drop per friction point — not more.
- Rotate the handwheel by hand ten times to work the oil into all friction surfaces before sewing begins.
- Wipe all oiled surfaces with a clean dry cloth. No visible oil should remain on any surface near the thread path or the fabric area.
- Sew 10 test stitches on a piece of white scrap fabric before returning to customer work. Check both sides for even stitching and check the fabric for oil marks. If oil has transferred, wipe the hook race area again and repeat.
- Record or take note of this session in your Oiling Log — date, hours sewn since the last oiling, points covered, and anything noticed. This entry takes thirty seconds and builds a maintenance record that will serve you for years.
Chapter 4 Summary
What You Know Now
- You know which oil to use — and exactly why every common substitute destroys your machine silently and expensively.
- You understand the six non-negotiable rules of correct oiling — and the reason behind every one of them.
- You know precisely where to apply oil on your machine, point by point, with nothing guessed or skipped.
- You have a frequency schedule calibrated for your usage level and Nigerian conditions — including the harmattan season.
- You have a Oiling Log to record every session and build a maintenance history for your machine.
- You have a step-by-step oiling checklist that walks you through a correct session every single time.
- If you own an industrial machine, you know exactly what your reservoir requires — and what it does not.
✌ Your Action for Today
Before you move to Chapter 5, do these three things:
- Check right now: do you have pure sewing machine oil in your shop? If you do not, add it to your shopping list and buy it before your next sewing session. Do not oil the machine again until you have the correct oil in your hand.
- If you already have sewing machine oil — oil your machine today using the six rules and the checklist above. Fill in the first entry of your Oiling Log while you do it. Do not postpone this. The longer you wait, the more wear continues without protection.
- If any of the wrong oils have been used on your machine in the past, repent.
This is not homework. It is the moment when the knowledge stops being on the page and starts being in your hands. That is when it actually protects your machine.
You have now done something that most tailors have never done deliberately: understood exactly what their machine needs, why it needs it, and precisely how to provide it. That is not a small thing. It is the kind of shift that shows up quietly, over time, in a machine that runs consistently better, stays quieter, and asks less of you.
Mama Ologi oiled her machine the same way — on a reliable schedule, with the correct oil, in the correct places. Not because she had engineering training or mechanical knowledge. Because she understood that a machine which earns your income deserves to be cared for properly. She gave it what it needed, consistently, and it served her for forty years.
That is exactly what you are building now. Not a fixed machine. A well-maintained one. There is a difference — and Chapter 5 adds the final layer to it.
Oiling protects your machine’s moving parts from friction and wear. But there is a second threat working alongside it, one that builds quietly with every metre of fabric you sew: lint. Fine fibres and thread dust accumulate inside the machine — in the bobbin area, the feed dogs, the needle plate groove — and they clog the very areas that correct oiling is protecting. Left unchecked, lint undoes the work that good oiling does. The two threats are connected, which means the two solutions must work together.
When oiling and a regular lint-clearing routine run together on schedule, they form the complete preventive system that the statistics confirms can stop up to 80 per cent of common machine faults before they ever start. Oiling alone is one half. Chapter 5 gives you the other half: a specific, timed, five-minute weekly routine that makes the protection complete.